Creating a Raspberry Pi Based PostGIS Server In Local Network
The idea behind this project comes from the GIS folks on twitter where few people have shared their experience with setting up a postgresql database or geoserver hosted on the Raspberry Pi. So, I decided why not!.
1. Introduction
Raspberry Pi is a credit-card-sized computer, and undoubtedly one of the most popular microcomputers, earning its big reputation for an affordable computing platform in electronics and computer engineering communities.
In this project, I’ll try to setup PostgreSQL database with spatial extension PostGIS enabled on the Raspberry Pi and host it over the Local Network. There are several applications to these but this one in particular is just demonstration project to grasp the better understanding of how each of these works together!
If you’re interested in this project, you must make sure these requirements meet,
- Raspberry Pi single-board computer.
- Formatted FAT32 SD card with a complete Linux distro such as Fedora or Raspberry Pi OS. If you don’t have a Raspbian SD card, this tutorial will show you the steps to create one.
- Must know about basic commands in SQL, Linux, and UNIX as well as have some experience in constructing PostgreSQL databases.
2. Setup SSH Connection To The Raspberry Pi
SSH or Secure Shell is a cryptographic network protocol for operating network services securely over an unsecured network. Typical applications include remote command-line, login, and remote command execution, but any network service can be secured with SSH.
SSH provides a secure channel over an unsecured network by using a client–server architecture, connecting an SSH client application with an SSH server.
To establish SSH (Secure Shell) connection to your Raspberry Pi from your computer over the network, please follow this link official guide by raspberrypi.org.
Enable SSH from Interfaces tab in Raspberry Pi Configuration. Use this command in terminal ‘hostname -I’ to find the IP address of the PI. Note down this IP. We’ll use this to connect from our computer to the Pi over the same network.
1
$ ssh pi@192.168.1.102
Enter password when asked and ‘yes’ to the prompt to establish the connection. 
3. Setting Up a PostgreSQL Database On The Raspberry Pi Device
PostgreSQL is a powerful, open source object-relational database system that provides an implementation of the SQL querying language.
Installing PostgreSQL
Refresh the server’s local package index:
1
$ sudo apt update
Then, Install the Postgres package along with a -contrib package that adds some additional utilities and functionality.
1
$ sudo apt install postgresql postgresql-contrib
This tutorial from DigitalOcean covers everything from Installation to quickstart with creating/updating Roles and Databases.
4. Creating Roles, User, Database and PostGIS Extension
Now that the installation for PostgreSQL is complete, we will proceed through creation of roles, users, database and add required extensions.
By default, PostgreSQL creates a user ‘postgres’ with the role ‘postgres’. It also creates a system account with the same name ‘postgres’. So to connect to Postgres server, log in to your system as user postgres and connect the database.
1
2
$ sudo su - postgres
$ psql
Now, we’ll configure PostgreSQL to make it accessible by your normal users.
1
2
$ postgres-# CREATE ROLE your_username WITH LOGIN CREATEDB ENCRYPTED PASSWORD 'your_password';
$ postgres-# \q
Replace your_username with the username and password of your choice.
After creating these User Role we’ll proceed with switching to the above user and create database with the user desired database name.
1
2
$ su - your_username
$ createdb my_db
Let’s first dig through spatial database in brief:
A spatial database is a database with column data types specifically designed to store objects in space—these data types can be added to database tables. The information stored is usually geographic in nature, such as a point location or the boundary of a lake. The spatial database also provides functions and indexes for querying and manipulating the spatial data, which can be called from a query language such as Structured Query Language (SQL). A spatial database is often used as just a storage container for spatial data, but it can do much more than that. Although a spatial database need not be relational in nature, most are.
Spatial database gives us a storage tool, an analysis tool and an organizing tool all in one.
PostGIS, initially a project of Refractions Research, has grown as one of most widely used database systems in Spatial World.
Why PostGIS?
Supporting Projects:
Proj: Provides projection support, now in its 6th generation dubbed Proj6 (@2019)
Geometry Engine Open Source (GEOS): Advanced geometry processing support
Geospatial Data Abstraction Library (GDAL): Provides many advanced raster-processing features
Computational Geometry Algorithms Library (CGAL/SFCGAL): Enables advanced 3D analysis
Standards Conformance:
PostGIS and PostgreSQL conform to industry standards more closely. Supports many of newer ANSI SQL features. PostGIS supports OGC standards and the SQL/MM spatial standard.
OGC: Open Geospatial Consortium, standardize how geographic and spatial data is accessed and distributed.
OSGeo: Open Source Geospatial Foundation, initiative is to fund, support, and market open source tools and free data for GIS.
American National Standards Institute (ANSI) or International Organization of Standardization (ISO) SQL, define general guidelines that SQL implementations should follow.
Standards on Geospatial data makes it most comfortable to work with data and APIs’ if standsa support many kinds of softwares - Cadcorp, Safe FME, AutoCAD, Manifold, MapInfo, Esri ArcGIS, ogr2ogr/GDAL, OpenJUMP, QGIS, Deegree, MapGuide, UMN MapServer, GeoServer, or even standard programming tools like SQL, JavaScript, PHP, Python, Ruby, Java, Perl, ASP.NET, SQL, or new emerging tools
PostGIS is Powerful :
Provides many spatial operators, spatial functions, spatial data types, and spatial indexing enhancements to PostgreSQL.
Functions to work with GeoJSON, KML, Vector Tiles (Mapbox VT - binary vector format popularized by MapBox) allowing web applications to directly talk to PostGIS without additional serializing schemes or translations.
Built-in 3D and topology support:
Over 300 seamless operations for working with vectors and rasters in tandem, as well as for converting between the two families.
Built on top of PostgreSQL, which is already one of the most popular of database systems.
PostGIS is free. Free as in Money. Free as in Freedom.
Installing PostGIS Extension to PostgreSQL.
By now it’s familiar that PostGIS is an extension to PostgreSQL with added spatial capabilities. We’ll install PostGIS using apt-get command:
1
$ sudo apt-get install postgis
Type Y and press enter. Now, after the completion of installation, the spatial support has been added to native PostgreSQL Database.
After installation of PostGIS, the next step is creating a PostGIS extension in our database where we’d like to have spatial data type support.
1
$postgres-# CREATE EXTENSION postgis;
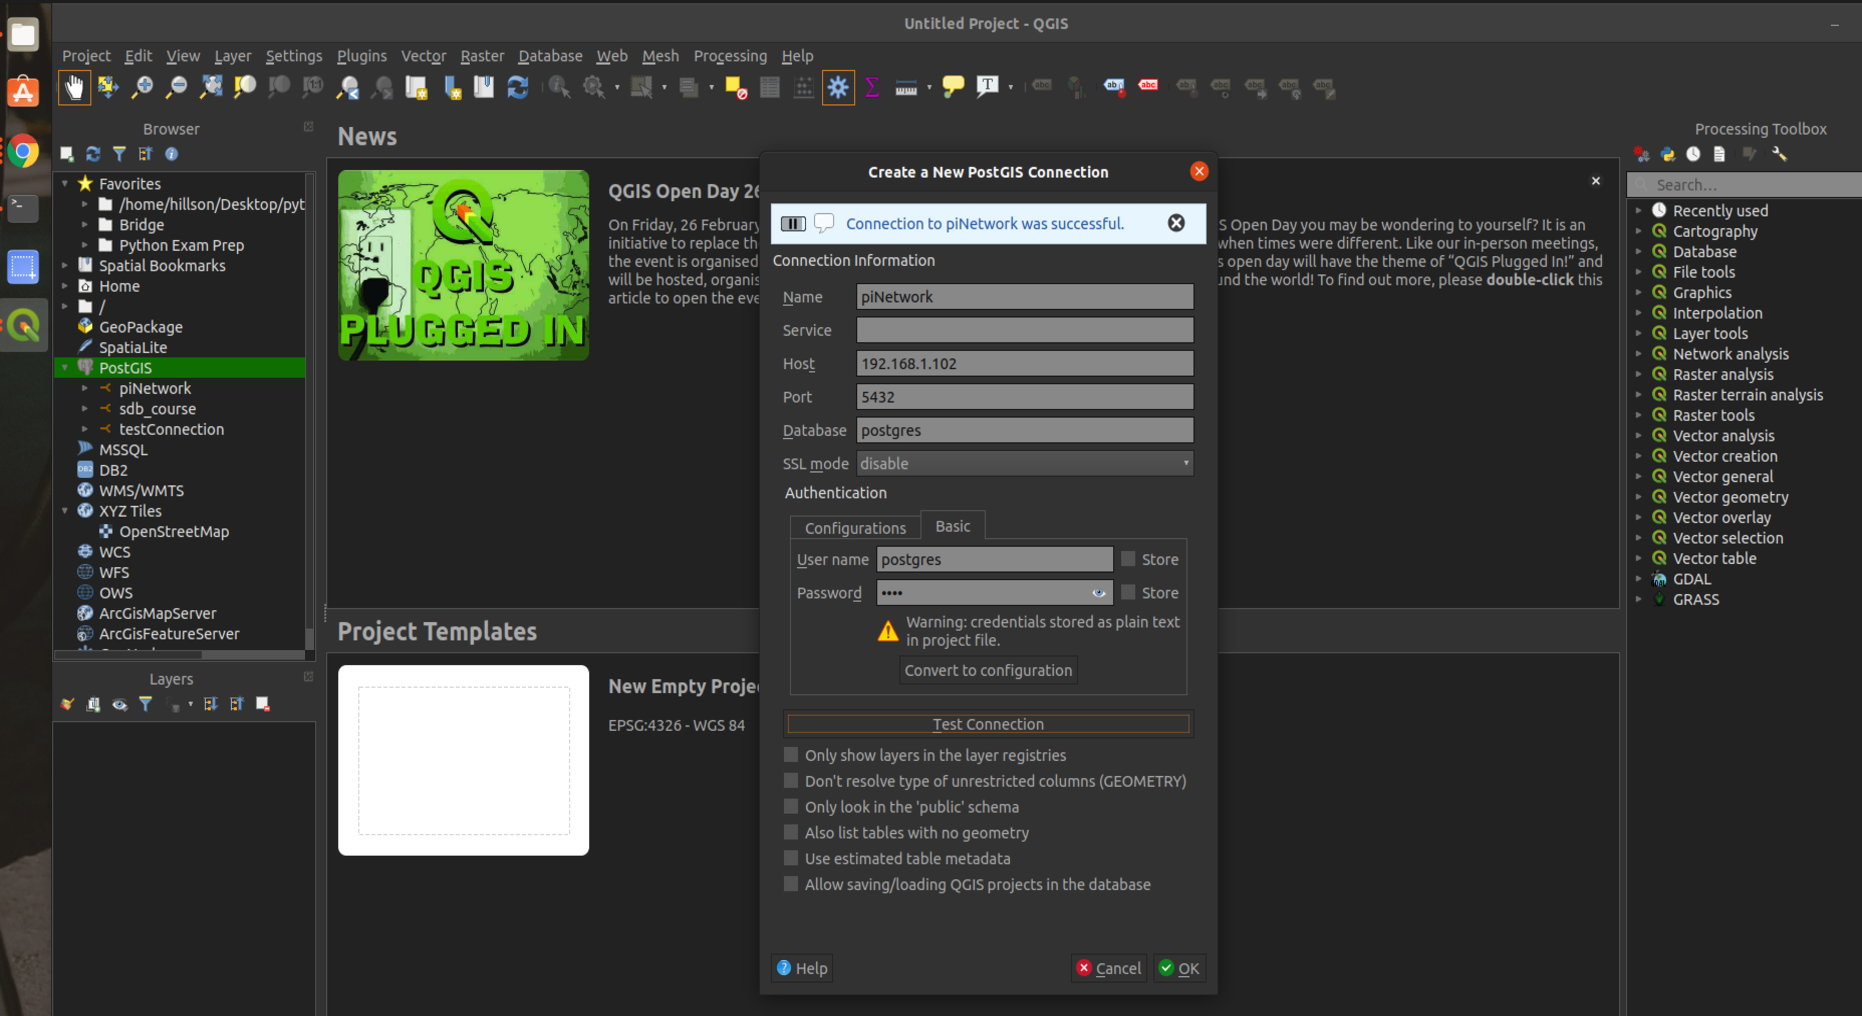
5. Setting Up and Testing the Connection with QGIS database connection tool
We are not just done yet! Infact, this is the most important step if we want to configure the postgreSQL database to be accessible from another machine. In order to be able to connect to the PostgreSQL Instance on the Raspberry Pi from another machine; we’ll make changes to pg_hba.conf file.
1
2
3
$ sudo nano <path to pg_hba.conf file>
In my case,
$ sudo nano /etc/postgresql/11/main/pg_hba.conf
Use the arrow key to move the cursor across the file. We’ll need to make changes and add an entry under IPv4 local connections:
1
2
3
host    all    all    `host-machine-ip/32`    md5
In my case,
host	all    all     192.168.1.86/32        md5
Press Ctrl+X, then enter Y and press enter to save the file.
Then we’ll make changes to postgresql.conf file.
1
2
3
$ sudo nano <path to postgresql.conf file>
In my case,
$ sudo nano /etc/postgresql/11/main/postgresql.conf
Use the arrow key to move the cursor across the file. We’ll need to make changes to the connections settings, to what IP address(es) to listen to. So, Find listen_address then we’ll need to uncomment it if it’s commented out and set it ‘*’ to listen to all IP addresses trying to access it.
1
listen_address = ‘*’
Press Ctrl+X, then enter Y and press enter to save the file.
After making these changes we may want to restart the postgreSQL server. This command makes sure it’s done.
1
$ sudo systemctl restart postgresql
If you have pgadmin installed on your host machine, we can try to make a connection to the remote postgreSQL server on the Raspberry Pi. 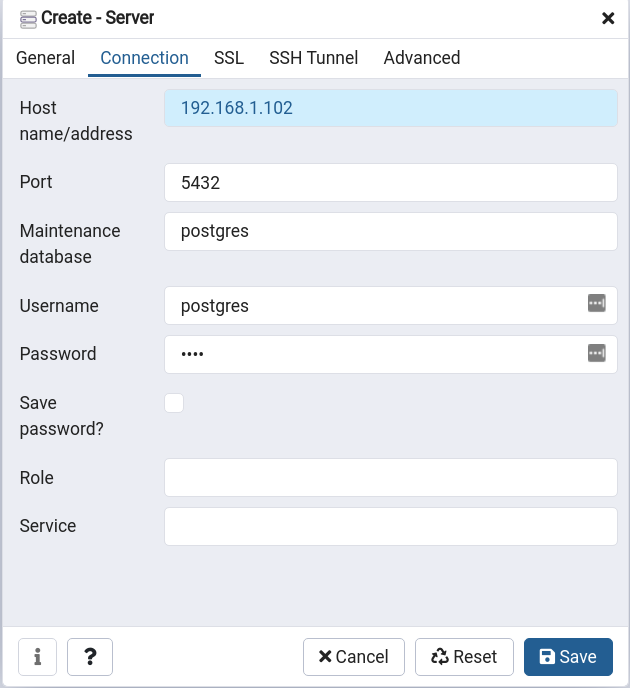
In the pgAdmin4 interface, Right click and select create server. In the General tab, fill up the name for the database connection. Under Connection Tab, we’d like to add following details,
Host name/address, which is the same IP address of the Raspberry Pi in step 2 of this post, that we made use of during our SSH connection. Enter the Port number, 5432 is the default port assigned to postgreSQL, if the port is available during the installation. Otherwise the open IP and the port can be found by entering network status command.
1
$ netstat -a | less
Select your IP and Port from the list of all open network status.
Fill up all the necessary information like, Maintenance Database, Username, Password, etc, and save the configuration to make connections to remote servers on Raspberry Pi.
Congrats, We have successfully established the database connection in our machine!
6. Visualization in the Quantum-GIS
Before we visualize data from the database, there are several ways we can populate the database beforehand. I mostly prefer the amazing tool shp2pgsql to load the shapefiles to the database, which transfers the geometry type and all the attributes to the database table.
We have the simple graphical interface that makes our work a lot easier, or command line utility for advanced users.
Establishing database connection is no different than above two methods we have done in qgis db connection and pgAdmin server connection management. Here is how the basic interface of shp2pgsql-gui looks like: 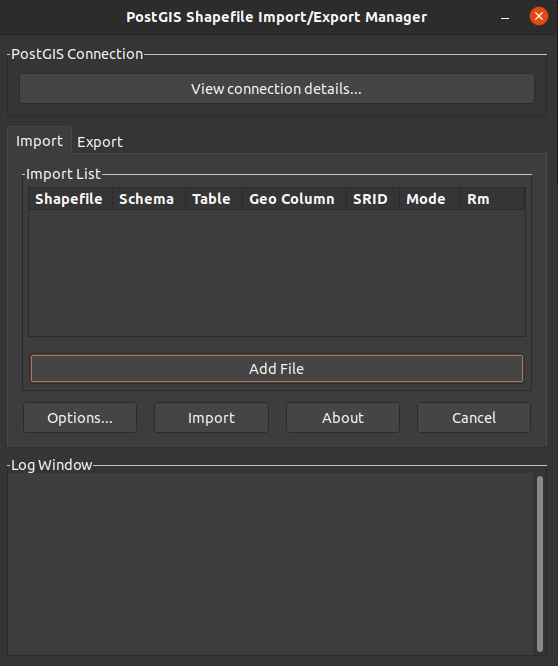
After loading the shapefile, and connecting PostGIS database to QGIS, we can easily load the dataset from the database for different GIS applications in QGIS.