Installing Geoserver on Linux - Ubuntu 18.04 or Mint OS
GeoServer is a Java-based software server that allows users to view and edit geospatial data. Using open standards set forth by the Open Geospatial Consortium (OGC), GeoServer allows for great flexibility in map creation and data sharing.
While GeoServer is an important asset in geospatial web platform, its installation can get bit tricky on Ubuntu, both for beginners or intermediate users. This guide is intended to make you just get started without crawling over internet for installation of GeoServer and just get you started for the job.
Lets begin the geospatial journey with Geoserver!!
This blog is also published on my medium↗️
First: Upgrade and Update Ubuntu
The first step is to update the package information in Ubuntu to latest version and also upgrade the latest package in the system.
1
2
$ sudo apt-get update
$ sudo apt-get upgrade
Step 1: Download GeoServer
a. Get the latest stable version (recommended) of GeoServer : http://geoserver.org/release/stable/
Download zipped Platform Independent Binary form the Package Section to local folder. e.g /Downloads/ in my case.
Step 2: Java Runtime Environment
GeoServer required Java Runtime Environment.
Check for Java installation using : $ java -version If Java is not installed, install it from apt repository using the following command in terminal windows:
1
$ sudo apt install openjdk-8-jdk
Step 3: Copy Package to Required Location
Open the terminal Follow the series of step in terminal window.
1
2
3
4
5
6
7
8
9
$ sudo mkdir /usr/share/geoserver
$ sudo apt install unzip

$ cd /home/&USER/Downloads/

$ sudo unzip ./geoserver-2.XX.X-bin.zip -d /usr/share/geoserver

$ cd /usr/share/geoserver/
$ sudo mv ./geoserver-2.XX.X/* ./
replace &USER with your username
Change the User and Group Ownership then Start the Service
1
2
3
$ sudo chown -R $USER /usr/share/geoserver
$ cd /usr/share/geoserver/bin
$ ./startup.sh
This will start the GeoServer. Go to the browser and visit the default site {0.0.0.0:8080}. The default username : admin and password : geoserver So, Now the GeoServer is up and running.
Step 4: Edit Start/Stop Script : init.d
Google for GeoServer Linux init Script. Go to search result redirecting to GeoServer Linux Script Page
a. Download Debian/Ubuntu init Scripts file. Link here. Save file in /Downloads/
Copy the text from downloaded file and paste in following file.
1
$ sudo nano /etc/init.d/geoserver
Then save and exit the file in nano editor.
b. Edit /etc/default/geoserver/
1
$ sudo nano /etc/default/geoserver/
 Paste the above text from the Geoserver Linux Init Script page and save the file. Note: Change USER, GEOSERVER_DATA_DIR, GEOSERVER_HOME and JAVA_HOME path as following:
 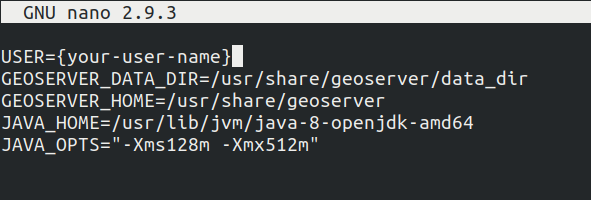 JAVA_HOME part can be accessed with following command:
1
2
$ cd /usr/lib/jvm/
$ ls
Step 5: Change User Mode
1
2
3
$ sudo chmod +x /etc/init.d/geoserver
Reload Daemon
$ sudo systemctl daemon-reload
To start the server {0.0.0.0:8080}
1
2
$ sudo systemctl start geoserver
$ sudo systemctl status geoserver
To stop the server
1
$ sudo systemctl stop geoserver
With this the installation of geoserver is complete.